Friday, February 10, 2017

System.Security.SecurityException: Request for the permission of type ‘System.Web.AspNetHostingPermission … failed

System.Security.SecurityException: Request for the permission of type ‘System.Web.AspNetHostingPermission … failed


error message on webpage 

Server Error in / Application.  Security Exception
 Description: The application attempted to perform an operation not allowed by the security policy. To grant this application the required permission please contact your system administrator or change the application’s trust level in the configuration  
 file.
 Exception Details: System.Security.SecurityException: Request for the permission of type ‘System.Web.AspNetHostingPermission, System, Version=2.0.0.0, Culture=neutral, PublicKeyToken=********′ failed.

Root Cause:
In IIS 7.5, the default application pool is no longer Network Service, like in IIS 6 (that came with Windows 2003) and IIS 7 (that comes with Windows 2008), but rather a built in account called ApplicationPoolIdentity. This is even more restrictive than Network Service, in that required trust levels for .Net assemblies to be loaded inside an application pool have to be greater than what was permitted with Network Service.


Solutions:

1) The easy way out is just to go back to using Network Service as an application pool identity instead of the ApplicationPoolIdentity used by IIS 7.5. However, this undermines the new security enforcements that the IIS team has created, and kind of defeats the purpose of using IIS 7.5 as opposed to IIS 7.5
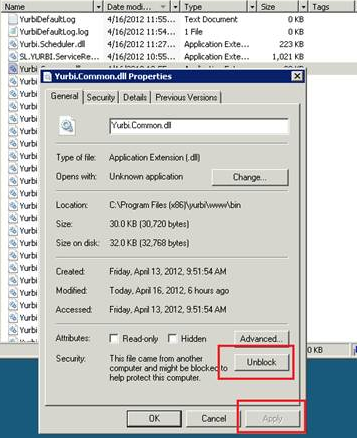
2) locate the file which is copied from other computer and unblock it by right click and click unblock

Image result for unblock file

to unblock the files at once use powershell command 

https://msdn.microsoft.com/powershell/reference/4.0/microsoft.powershell.utility/Unblock-File

PS C:\> dir C:\Downloads\*PowerShell* | Unblock-File

or

PS C:\> dir C:\Downloads\*PowerShell* | Unblock-File -Verbose


or using stream utility to search and unblock files

1-Download streams.exe from SystInternals - http://technet.microsoft.com/en-us/sysinternals/bb897440.aspx
2-Go to command prompt (cmd.exe)
3-Navigate to where you have streams.exe installed
4-Use command line switches: streams.exe –s –d “
This removed the Internet Zone restrictions from all files under “” and its subfolders as well. [Deleted :Zone.Identifier:$DATA]
References:

Wednesday, February 8, 2017

Citrix IMA Service Failed to start


Problem: Citrix IMA service failed to start 


1 Change the registry key HKEY_LOCAL_MACHINE\SOFTWARE\Citrix\IMA\RUNTIME\PSRequired to 0


2 Restart the IMA service.

Description:

dsmaint recreatelhc, which renames the existing LHC database, creates a new database, and modifies the following registry key HKEY_LOCAL_MACHINE\SOFTWARE\Citrix\IMA\Runtime\PSRequired key to 1.
Setting the value PSRequired to 1 forces the server to establish communication with the data store in order to populate the LHC database. When the IMA service is restarted, the LHC is recreated with the current data from the data store.


Note: For XenApp 6 or later the registry key path is HKEY_LOCAL_MACHINE\SOFTWARE\Wow6432Node\Citrix\IMA\ RUNTIME\PSRequired


There is also a built-in utility to verify the LHC called LHCTestACLsUtil.exe file located in C:\Program Files (x86)\Citrix\System32 of the XenApp server. To run this utility, you must have local administrator privileges. CTX133983 - Citrix IMA HELPER TOOL

Disable Auto-Restored and Auto-Retained Printers Citrix Xen App 7.5,6.5,6.0,5.0

Disable Auto-Restored and Auto-Retained Printers

Auto-retained and auto-restored printers are printers that are not initially auto-created and are manually added to a user’s session.

Auto-retained and auto-restored printers are stored in user profiles under HKCU\Software\Citrix\PrinterProperties. Implementing the DefaultPrnFlags value in the Instructions Section still writes information to this key; Without this flag, users or administrators would have to manually delete these printers or a script would be required to delete the sub keys under HKCU\Software\Citrix\PrinterProperties.


To disable these type of printers add or modify this registry value on each server in the farm.

If the DefaultPrnFlags DWORD already exists on the server, add the specified hexadecimal value to the current value.

Key: HKEY_LOCAL_MACHINE\SOFTWARE\Citrix\Print
Value name: DefaultPrnFlags
Type: REG_DWORD
Value data: 0x80000000

DefaultPrnFlags registry value requires a DWORD in hexadecimal only. 

In earlier versions of XenApp, this setting was configurable using a registry setting and per-server.

Saturday, February 4, 2017

Citrix MFCOM errors

Error
"Citrix MFCOM Service did not respond as expected. Make sure that your user account is a member of this computer's Distributed COM Users group if you are connecting to a remote server. Check the version of Citrix Presentation Server on the computer and make sure that a compatible version of Citrix MFCOM Service is installed and running."

Resolution

go to Component Services within Administrative Tools

Expand Component Services
Expand Computers
Expand My Computer
Expand COM+ Applications
Expand Citrix IMA COM Interop
Expand Roles
Expand Citrix Administrators
Right click Users and add an existing user or group

***


To re-register MFCOM in Windows complete the following procedure: 
  1. Navigate to the %programfiles(x86)%\Citrix\system32 folder from the command prompt.
  2. Run the following command from the command prompt:
    mfcom /unregserver
    No output is displayed
  3. Run the following command from the command prompt:
    mfcom /regserver
  4. Run the following command from the command prompt: (for XA 6.5)
    regsvr32 mfcomsrv.dll
  5. Click OK.
  6. Open the registry editor and navigate to the following entry:
    HKLM\SYSTEM\CurrentControlSet\Services\MFCom
  7. Create a DWORD value with the following details:
    Name: ServiceSidType
    Data: 1
  8. Restart the server.
  9. Verify if the Citrix MFCOM Service is displayed and has started.


Missing Citrix MetaFrame COM Server

I am picky when it comes to the Citrix XenApp servers on which I work.  Warnings and Errors in the event logs just drive me up the wall.  They are both to be banished if at all possible.  A client site I was at recently fixing issues had hundreds of DCOM errors recorded in every XenApp server’s System event log.   A particular event that is recorded is shown in Figure 1.

Figure 1
One of the common reasons for this error is when an administrator executes the Citrix Management Consoles on XenApp servers which are not Zone Data Collectors.  Best practice is to install and run the Citrix Delivery Services Console and Advanced Configuration Console on the Zone Data Collectors.
To resolve this error, Microsoft recommends the following steps be followed (http://tinyurl.com/DCOM10016 ).

DCOM Repair Instructions:

  1. Copy the CLSID
  2. Open the registry editor
  3. Search for the CLSID
  4. Record the name
  5. Open Administrative Tools -> Component Services
  6. Double-click Component Services
  7. Double-click Computers
  8. Double-click My Computer
  9. Click DCOM Config
  10. Scroll down and find the object with the name you recorded earlier
  11. Right-click the object and select Properties
  12. Click the Security tab
  13. In the Launch and Activation Permissions section, select Customize and click Edit…
  14. Add the user reported in the event
  15. Select the user just added and check Allow – Remote Activation
  16. Click OKOK and exit Component Services
CLSID {ED62F4E3-63C2-11D4-94D8-00C04FB0F326) is MetaFrame COM Server and is found by that name on most servers at this client site.  On a few of their servers, I ran into two issues in Component Services:
  1. CLSID found but not MetaFrame COM Server.
  2. Neither MetaFrame COM Server nor the CLSID is found.

CLSID found but not MetaFrame COM Server

Searching the registry for the CLSID on one server returned what is shown in Figure 2.

Figure 2
I knew from other servers that this should be showing as MetaFrame COM Server (Figure 3).

Figure 3
Looking in DCOM Config shows no component named MetaFrame COM Server (Figure 4).

Figure 4
However, the CLSID of {ED62F4E0-63C2-11D4-94D8-00C04FB0F326} is found (Figure 5).

Figure 5
For this server, the problem is simply that the component does not have the name configured.  To fix this problem, return back to the registry editor and double click on (Default) (Figure 6).

Figure 6
For Value data Enter MetaFrame COM Server, click OK and exit the registry editor (Figure 7).
Note: This entry may be case sensitive, so enter the Value data exactly as shown above.

Figure 7
In Component Services, click on DCOM Config and then click on the Refresh icon (Figure 8).

Figure 8
The MetaFrame COM Server component is now in the proper location (Figure 9).

Figure 9
You can now use the instructions given above under DCOM Repair Instructions, to add the user and assign the Allow – Remote Activation permission.

Neither MetaFrame COM Server nor the CLSID is found

On one server, the Citrix MFCOM Service is missing (Figure 10).

Figure 10
Also, the MetaFrame COM Server is missing in Component Services (Figure 11).

Figure 11
The CLSID of {ED62F4E0-63C2-11D4-94D8-00C04FB0F326} is also missing (Figure 12).

Figure 12
To fix these issues, from an elevated command prompt, register both by typing the following commands (Figure 13).
mfcom /regserver
mfreg /regserver
net start MFCom

Figure 13
The Citrix MFCOM Service returns and is started (Figure 14).

Figure 14
In DCOM Config in Component Services, the CLSID appears (Figure 15).

Figure 15
Open the registry editor, search for the CLSID and double click on (Default) (Figure 16).

Figure 16
For Value data Enter MetaFrame COM Server, click OK and exit the registry editor (Figure 17).
Note: This entry may be case sensitive, so enter the Value data exactly as shown above.

Figure 17
In Component Services, click on DCOM Config and then click on the Refresh icon (Figure 18).

Figure 18
The MetaFrame COM Server component is now in the proper location (Figure 19).

Figure 19
You can now use the instructions given above under DCOM Repair Instructions, to add the user and assign the Allow – Remote Activation permission.